Monday, March 3, 2014

Easy Hot Dogs

Not the sucess story I was hoping for...  The ease of the homecooker meant, less dishes out on the bench and the beeping timer so I should have been able to do this beautifully!

First problem, it really felt like the water took way longer to boil than it usually does in my pot.
But anyway, it boiled, I steamed the long rolls in the large steaming dish and cooked the franks in the pasta bowl thing.


The buns were ok, they stick to the bottom and the side a little less that they do in my regular pot with the steamer attachment.  I could also fit all 6 in the container at one time, which I cant do with the my other pot.  I left them in there for a few minutes and while the franks cooked.
I cant remember the time I set...but it was too long!  By the time the water had come to the boil and I had left it long enough for the buns to get  steamed/warm up, the franks were a little bit split!


But in the end we ate hotdogs that tasted as good as if they had been cooked any other way, and I covered up the "splitness" with enough cheese and sauces, so it didnt matter!!


Saturday, January 18, 2014

Day 8 - Making Noodles

I really wanted to explore this for cooking pasta....so I started with 2 minute noodles for lunch!
As far as cooking the noodles go, it would have been easier and quicker in a regular pot, but it could be useful for cooking regular pasta... and steam some veges at the same time.

I got the water boiling, which took about 10 minutes, put the noodles in and set the timer for 6 minutes, when I came back the water had partly evaporated so not all noodles were cooked properly, but it was fine, we ate it.  

And I added some stir fried courgette, mushroom, garlic and rocket to it and threw a few chopped tomatoes on top.  


My conclusion is that it isnt really much use in this capacity, it is just as easy and quick to cook pasta in my regular pasta pot!  And my pasta pot has a steaming rack in it too, so I could do that there (and use the microwave timer)

Friday, January 17, 2014

Day 7 - Continental Pasta Packets!

Well they thought they were making a convenient meal already with the pasta mixes... little did they know that i wanted it to be even more convenient!!

I took their pasta packets, followed the instructions...basically... and left it to cook while I did...other stuff... no idea what I actually accomplished in that time, but still...the idea is there...

These were left over from our camping trip, and frankly they are quite disgusting!  I normally would keep anything like this, packet, instant, camping/tramping meals in a box and pull them out for our next away trip...but these were just not worth it.  The only way you can make them taste good is by adding plenty of fresh type foods to it.

So first of all I threw a couple of mushrooms and some courgette and a left over chicken drumstick into the homecooker and gave it a quick grill/fry...no, saute!  (175*C for 15 mins)

I then set that aside and put in all the ingredients as stated on the packet, butter, milk and water... only difference is that I left out most of the powder.... I kept changing my mind about how to do things so the mix got tipped from one container to another and I noticed that all the powder sank to the bottom, so it was easy to just not tip it all into the mix.  While it probably made it a completely different flavour... or rather, no flavour.... it definitely tasted better, a lot less processed and artificial and salty!


I also chucked in a handful of oregano, as my herb box (and vege garden) are getting taken over by it so I needed rid of some of it!!

Set timer for another 20 minutes and went away to accomplish something great....

When I came back it was all ready and just about to stick on the bottom, and I had forgotten that I was going to add the sauteed stuff for the last 5 minutes, so I had to put it on some more chuck those in, grated a bit of Parmesan cheese and then when it beeped, I served it on to plates for me and the kid and told them it was macaroni cheese... but they still didn't like the mushrooms and courgettes...


They should just be thankful I didn't top theirs up with tomatoes and rocket as well... but I was thankful that I did...quite the scrummy lunch as it turned out!  If only I could take this appliance camping or tramping with me!


Thursday, January 16, 2014

Day 6 - Adapting a recipe from Healthy Food Guide


Pasta with Creamy Tomato Sauce and Chicken


Here is the link to the original recipe, it is really yummy, so even if you dont have a homecooker, you should make this.


So this is how I incorporated the homecooker.  I put the oil, cherry tomatoes and garlic into the homecooker.  I set the temp to 175 and the timer for 20 mins.  (Unfortunately I wasnt finished prepping the other things at the end of 20 mins, so I kept adding another 3 or 4 mins until I was ready!) I think they could have roasted for about 30 mins I guess.  I started with the lid on for a few mins, just to make sure the temp was nice and high, and then took it out, I also didnt turn the stirrer on for about 5 minutes or so, to get the going, but then I was worried about sticking, so I turned it on.

Roasting the tomatoes and the garlic
I am yet to figure out how to cook pasta in the homecooker, so I put the pot on the stove and made the pasta according to the packet directions.  (Although I think next time, when I figure out how to do pasta properly, I will do the pasta in the homecooker and the rest of the sauce can just go on the stove top maybe.)

So then i set aside a few roasted tomatoes and peeled the garlic and then put the garlic and the rest of the tomatoes into a bowl and got the stick whizz out and purreed them all, then I added the other ingredients to it and tipped it all into the homecooker, set the temp at 70, stirer going and set time for 20 mins...or until the pasta and the garlic bread was ready.   The evap milk almost seperated (as usually happens to me because I dont pay close attention to things) but somehow I managed to save it by tipping a little more milk in and taking it off the heat quickly then paying more attention when I warmed it thru just before serving.
The creamy tomato sauce... blurryness due to moving stiring attachment

I forgot again to take a photo of the finished product on the plate, but it looked pretty good, and tasted really good...and yet the kids still went to bed without finishing their dinners!  I have no idea what they like!  They are crazy!  :)


Wednesday, January 15, 2014

Day 5 - Making Fudge


Fudge made in the Philips Jamie Oliver Home Cooker

I found this recipe on pinterest...check out my pinterest board here.

The lady who put up the recipe was testing the homecooker for Philips, and she sold this idea of doing fudge like this well.  Not having to stand over the pot stirring constantly because the cooker does it by it's self.


Well, I found, that if I made the recipe exactly as she said to, it didn't work.
All ingredients into the pot, temp set, timer set

Fudge at a rolling boil


  My fudge looked nothing like it!

Finished "set" fudge!!!


The "fudge i ended up with was more like a gooey toffee or something, inedible and with big butter swirls!!
So I thought I would give it another go, I really felt like it needed a proper beating, so I put it into a pot and remelted it, got the electric beaters out and went for it...
.... but part way through this process I got to thinking, maybe it is more about the boiling, maybe it is supposed to boil for a time and then it will set properly... but I didn't have time to do this right now as I was supposed to be at church in about 20 mins and was still in my pjs....
So I left it in the pot on the stove (turned off!)
When I came home the fudge did seem quite well set and right...but it was stuck in the pot and I couldn't get it out in nice pieces....
So I re-melted it....unfortunately, this time the bottom caught which gives it that interested "flame grilled" taste!  I didn't let that put me off and as soon as it melted I got the beaters in there gave it another go and this time tipped it into the cake tin to set.

It looks good. a little darker the take 2 and a lot darker than the picture... but it seemed to be the right consistency, so I tipped it out on to the cutting board.... unfortunately, I tried doing this with one hand as I was brushing my teeth with the other hand...and I dropped most of it on the floor... I saved it quickly and my pieces are more creatively cut...a knife was never used this time.... 


It tastes fine, with that flame grilled feeling.... and in retrospect I think I could make it again, but next time give it a proper beating with the electric beaters when the cooking is finished before pouring it into the tin.

Fudge = Success...in theory


Monday, January 13, 2014

Day 4 - Porridge

This morning I made porridge.  I have my old favourite porridge recipe that my grandfather "Bill" used to make, but I thought maybe, just maybe Jamie Oliver might have something to offer here... and the recipe in the book, is a little faster and simpler...so why not eh?

Perfect porridge with banana & maple sirup

We decide to forgo the toasted almonds, so save 8 minutes.  I set the temp and set the time


... and Jamie suggests that if it isnt runny enough, just add a splash of water....well I ended up setting the timer for another 4 mintues, then upping the temperature and another3 and another 5 minutes, before deciding it was good enough.  I dont think I like it super stodgy, but I do like it at least as thick as the above picture looks like it is!

On the whole we were all happy with the end results, and my favourite part was not having to clean up the microwave from the jug boiling over!!  I will probably make it this way again.


Result = Sucess

Friday, January 10, 2014

Day 3 - Chicken Curry in the Jamie Oliver Homecooker

Once again i decided I wanted to use the homecooker, but didn't have the right ingredients to make anything in the book....so I improvised.

I turned to the recipe book, for Creamy Chicken Korma
Creamy chicken korma with coconut rice

So, no korma paste (or other mild curry paste) so i used sweet chili sauce!  While I waited for the the homecooker to heat up (which actually took a lot less time that it took me to prepare the next part)  I chopped the onions, crushed the garlic, opened the jar of ginger, looked in the garden for my coriander...turns out it has gone to seed so I got out the jar of dried coriander leaves and the jar of sweet chili sauce (this is homemade from my homegrown chillies!!)


I then chucked all this into the homecooker, turned on the stirrer and set it for about 20 minutes or whatever the book said...but came back after about 10 minutes, because I couldn't be bothered waiting
NB.  Am starting to enjoy the convenience of the Homecooker machine, I could just set it and then go and fold the piles and piles of washing I am getting through after 2 weeks of camping!...so anyway

Added the chicken (I don't like chickpeas so I just left these out anyway!)


Just after the chicken is tipped in

I then tipped in a can of evaporated milk (because I didn't have coconut cream) brought to boil...didn't come back straight away... almost overflowed... caught it and turned it down to 110 and then set the time for about 20 minutes, seemed fine.

Served over brown rice (yes feeling all healthy!!)  that was cooked separately in the rice cooker.
That was the disappointing thing, I definitely felt like the advertising hype implied that you could cook the whole meal in the one machine, ie, chicken curry and rice all together.... or spag boll where you cook the pasta and the mince together, but it looks like it's really just one or other.

I forgot to take a pic of the final cooked meal!  But it tasted fine, didn't look that great as the evap milk separated in the cooking.  I will do some grocery shopping in the next couple of days and then I will make sure my recipes are planned and ready for mr homecooker!!


Day 2 - a little bit of museli

I had some oats and a handful of chopped walnuts to deal to so I thought, my first experiement in the Jamie Oliver Homecooker could be a bit of toasted Museli...

I flicked open the book to find their recipe...as a starting point!

Homemade toasted granola


I didnt have any seeds, runny honey, dried fruit or nuts apart from a few walnuts....

So I heated the homecooker to 175 (as directed) and tipped what I had plus a big old squirt of maple syrup, set the timer for 20 minutes and walked away.

At the end of the 20 minutes the machine beeps and turns off and keeps beeping until you come back...or a while anyway, havent tested the length it goes to to ensure your return as yet.
When I came back, mine looked nothing like the picture above!?!?!  But it looked fine, maybe next time, I will time it a little shorter or possible make it a little cooler, we will see!

I have tipped it into my museli container and considered Test 1 a success!


21 Days of Jamie Oliver Homecooking, by Philips

Day One (sorry no recipes today!)
I got a Jamie Oliver Homecooker  for Christmas from Santa (via my husband's work gift!  He works for a company owned by Philips)  so anyway, I love appliances, so I was pretty excited about this, packed the instruction manual and recipe book that came with it to take camping as part of my reading material... unfortunately I was a little disapointed with everything I read... It seemed a bit a let down.  Typical Jamie Oliver recipes...not really for the home "chef"  in the book, but, then again, I think I can adapt and change things for the ingredients I have...worth a try anyway.

So, before I just give up on it and say it's not worth the hype, I figured i would give it a chance and see if I can do something in it for 21 days in a row before I decide if I like it or not!!!

Philips  Jamie Oliver HomeCooker 1500 W HR1040/90this is what the Homecooker looks like and if you follow this post I can show you what the homecooker can...or cannot do!!

Day one requires something more than a breif introduction I guess, so I did a bit of recesarch to find recipes and tips.  I found this pinterest page
http://www.pinterest.com/lynvanb/jamie-oliver-homecooker/

this facebook group - although you have ask to join, so you wont see their stuff straight away (it only took a couple of minutes for me to be approved though!!)
https://www.facebook.com/groups/421961607918987/?notif_t=group_r2j_approved

another facebook page
https://www.facebook.com/pages/Jamie-Oliver-Homecooker/350747891687838?ref=stream

all recipes currently only has one recipe on it for the homecooker, but maybe there will be more later....
http://allrecipes.com.au/recipes/tag-8262/homecooker.aspx?o_fc=41&o_is=RD_More+Recipe+Collections_Title:+1,Philips+%7C+Jamie+Oliver+HomeCooker

some more recipes on the uk all recipes site...
http://allrecipes.co.uk/cooks/82418/philips-jamie-oliver-homecooker.aspx

bear in mind that this is just research day, so I haven't tested any of the recipes on these sites or look too thoroughly at them.
Here is my pinterest board of recipes that i am keen to try in the homecooker, and I will note any adjusted recipes or made up ones on my recipe blog page, here


Monday, September 23, 2013

Meal Plan and Shopping list for the week

In an ideal world I will include some recipes with this so you can use a similar meal plan if you so desire.
It is Sunday night and I plan to go shopping on Tuesday.  I still have a fair amount of meat and other meal bases in my freezer, so hopefully I can do a relatively small shop and fit it in the bottom of the pushchair and walk home after mainly music!  (hopefully that thunder storm comes another day!!)

Meal Plan
Monday:  Mexican Meatballs (Destitute Gourmet $15 meals book, pg 52)
Tuesday: Sausage + something + roast veges Pie (left over sausages and roast veges)
Wednesday: (Paul going out)  Chicken Stew with Spicey Sausage and Dumplings (DG $15 pg. 55)
Thursday: (Paul Elders Meeting) Pulled Pork on buns with coleslaw or maybe with mash potato (pulled pork in freezer given to my by a friend when I was sick, but she made far too much...sucker!?!! ;) )
Friday: Sausage Loaf with mash potatoes etc (I have leftovers that my sister-in-law brought to a potluck dinner...and then left behind!! Sucker! )
Saturday: (Me out probably all day) Lunch - Fam should come and buy sausages from Bunnings
Dinner - Nachos (left over taco mince in freezer, just add tomatoes and beans)
Sunday: (Paul and I both involved in Church Service) Lunch - Hot Dogs
Dinner -Chicken and Camembert Pie (left over cooked chicken, flakey pastry sheets in freezer and left over camembert)
Monday: Spag Boll (left overs in freezer, use up wine)

Last week of school before holidays.  Have a fair amount of birthday party food lefts overs to get through.  A little for lunches, a little for afternoon teas, a little for desserts.

Plan for holidays...
-"tramping 1 night"
-"Trains weekend"
- Working 2 or 3 days - easy no prep meal for those nights
-
Shopping List:
Franks
Hotdog buns
Sour Cream
Fetticini
cabbage

SO that's the plan for the week...can I stick to it... probably, I think it looks pretty easy.  Not too much cooking from scratch actually.  I wonder where I am at with the grocery budget this month anyway!


Wednesday, June 26, 2013

Part 2 - Using Up Leftovers

One of the easiest ways to save money on food is to just use it again!  No not regurgitating it and putting it back on the plate...but instead of throwing away the stuff that doesn't get eaten, save it and make it into something else. 

The first rule to using up leftovers is making sure you save some when you are serving up the “real meal”!!  Sometimes you might just want to add an extra 100g of mince or maybe use 4 chicken breasts where you would normally use 3.  But other times it's all about the way you serve it.  I have made a special effort in recent months to not serve the kids up quite as much food as I had been, not because I am being stingy, but because it is often such a struggle to get them to finish it...maybe they didn't actually need that much food and I am being a bit too mean by forcing it down them!!  
Not all meals work as leftovers, but with the ones that will work make sure you put aside some when you are serving up.  Sometimes it will work as a repeat meal sometimes you can just take some of the meal or a specific vegetable and turn it into something else.  Add more rice, veges and/or sauce to the meals to make it go further (hey that is a good idea for next week's post!  making meals go further... yes will start that soon!) 
 
Ham and Vege Strata - This could be made with left over meat (doesnt have to be ham) and left over stir fry or roast veges - also uses the stale bread that no one wants to eat anymore!
I have a bunch of meal plans that rely on leftovers…I’m not sure where to start…with the meals that I save the leftovers from or the recipes I use the leftovers for.
….ummm..
Maybe I need to mix it as I go….

Last week I gave the recipe for Roast Chicken Casserole, from the roast chicken leftovers…obviously not so much for the night following…but it freezes well.
I always try to save as much chicken as possible from a roast chicken meal.
I save it in small containers to throw into various meals including
Pizza – meatlovers, satay chicken pizza, chicken Camembert and “brie”

Hawaiian Pizza (opened tin of pineapple and bits of ham left over from Christmas...or something else!)  and Chicken Satay Pizza (- cooked chicken and left over satay sauce)

Kowhai Chicken – My favorite yummy casserole dish
Chicken Sopa – Another great Mexican chicken dish (save some tortillas from the burrito meal too I like to buy the 15 packs from Countdown, best value for money…only problem is, that I usually shop at Pak n’ Save…so making the special trip to Countdown for one item isn’t that good of a money saving technique)
Fettuccine “Cabonara” – a handful of chicken at the last minute…or one of the minutes near to the end at least.  (Any left over meat is good for this one – sausages, other roasts…not so much mince though)

Leftover Nacho Mince:
A “handful” for a Mexican inspired pizza
Spread over the bottom of a casserole dish and make Cowboy Casserole or Cornbread Pasta something or other Bake

Whenever I make meatballs I always set aside a few to use on pizza.


So to end this…before I have to spend the whole rest of the week writing up recipes on the recipe page…I will say Pizza, Pizza Pizza…. If you are trying to save money on meals, make a quick base or a fancy base or a bread maker base and top it with left over anything!  (Oh and make sure you save a bit of tomato based pasta sauce for the base topping!!)

(by the way, I am going to try to take more photos of my leftover meals and will add them to this post in the next week or so, and the recipe links are coming soon too!)

Sunday, June 16, 2013

This month we are taking our budget seriously!! (part 1)

Ok, SO it’s been a while since I last wrote a post.  It’s quite hard really to think of things I have to say, that someone might be interested in… but maybe you might be interested in this one… it’s about budgeting.
There’s always something in the media about budgeting, it seems the latest and greatest budgeter at the moment is the facebook woman…or man who was on NZ Best home baker, for one episode apparently… How to feed afamily of 6 for under $20.  It’s all good, a lot of help for people who don’t know where to start.  I personally am a huge fan of Sophie Gray….the Destitute Gourmet.  I think I have all of her recipe books….apart from one, which mum has, so I share it with her!!!  Because I am on a budget!!
Last month we had a bit of a budget blowout.  It started with our 10 year wedding anniversary celebration trip to Queenstown, 

Me screwing up my nose to look so beautiful
which was getting paid for by money that hadn’t yet come into the account!!  And ended with 2 plumber call outs, a new lawn mower, me backing into someone’s car and paying up front for a trip later in the year.


So this month we had to somehow make up for some of that.  Rules include: no takeaways all month (apart from Mother’s Day!) and try and empty out the freezer and halve the grocery budget!
So I have been getting creative.  I was lucky, in the fact, that there were a few good bits of meat in the freezer that hadn’t already been planned into meals, and both our freezers were somehow chocka! 
1. I think one of the best ways to save money is thru planning.  Write a meal plan and stick to it.
Example of a meal plan that I havent been sticking too and is longer than 1 week (what not to do!!)

  I like to plan 1 week at a time.  I used to plan for the whole month, but then I would just end up forgetting things off the list….. or changing my mind ….or things would go off.   It just wasn’t working out for me, so I decided to try fortnightly and then weekly.  This is working really well for me, and 4 months in a row, I have managed to come in right on budget, or a few dollars below.

    1. But because this month is tighter than before. I did my initial week and then I have added to it.  So now I have a 12 day meal plan, that should take me thru to next payday.  I think I shall put the meal plan next….in an ideal world I would link to the recipes that I can or to the book you need to buy.
    2. As it worked out, there were a number of meals that had a reasonable amount of leftovers, so I have frozen it and planned it into another meal.  E.g.  After the Roast Chicken there was heaps of gravy and stuffing left.  (I had used the left over chicken for other things!) So I have a new meal waiting that is going to be a roast chicken casserole.  I also found a couple of extra drumsticks to use as the chicken.  And I did the same for Corned Beef (and Corned Beef Casserole)

Thursday, February 7, 2013

Money Saving Tip Post


I am a real stinge so when it comes to saving money I think about it a lot.  Although, now, with 3 young kids I am also in the predicament of wanting to save time as well, and often the 2 things don’t go hand in hand.
But one thing it can work out for school/kindy lunches.  If you get ahead of the game you can save time without spending lots of money on packet snack foods from the supermarket.

One thing I haven’t managed to progress to is packing the lunches the night before, that would make the mornings a lot easier…but on the nights that I remember to think about that, I just feel too tired and really cant be bothered leaving the couch.

5 things I do to make packing lunches easier
1.         Firstly I make a list of options, so I don’t have to think so hard each morning.  This is my list:  Feel free to cut and paste and change it as is useful to you


Tuck Small/handful snacks in muffin cases

e.g.  orange/ handful of raisins
 - 1 sandwich / 1 muffin
 - 1 yoghurt
- fruit roll up
 - chocolate biscuit
always water bottle, sometimes a little juice packet or something

 
IN LUNCH BOX
- 2 fruit
-2 bread/starchy
-1 dairy
- 1 healthy treat/snack
-1 treat
Drink/water bottle


FRUIT
•Fresh or canned fruit – fruit kebabs, chopped fruit in a tub or fruit salad, easy peel mandarins, vegetable soup in a flask,
 •Dips/Hummus with vegetable sticks like celery, carrot, cucumber
 •Celery sticks with a thin spread of peanut butter topped with sultanas.
 •Jelly and fruit
* Cherry Tomatoes
* Cucumber pieces (with a little salt?)

STARCHY/BREAD
•Slice of Raisin toast or bread, pikelets, pancakes or scones with a little margarine or fruit spread
 •Lightly spread muffins and crumpets
 •Rice cakes topped reduced-fat cream cheese, vegemite or sliced banana
 •Small pita bread or wraps (spread thinly with cheese spread or peanut butter, grated carrot, sprouts and roll up to serve).
 •Wholemeal crackers with a slice of low fat cheese
 •Mini Wheats breakfast cereal
 •Handful of home made pita chips (cut pita bread into triangles, sprinkle with parmesan cheese and bake 180ÂșC for 15 minutes until crisp).
*Left over rice/pasta dishes
*Sushi
*Corn thins
*Muffins
*Cold Noodles?

HEALTHY SNACK
 •Popcorn with a few dried apricots or sultanas

DAIRY/Protein
 •Slice of low fat cheese with carrot and celery sticks.
 •Low fat cheese cubes or sticks.
+Cheese toasties
+ Franks/small sausages (cut octopus legs and little eyes)
+ Yoghurt with a handful of muesli on top

SNACKS
*Pretzels/Popcorn/Pikelets/Crumpets


  1. I buy a loaf of bread per child, sometimes more… then I spread the whole lot with spreads of their choice e.g. My son likes honey, jam, peanutbutter and mixtures of the lot, but my daughter only likes marmite (sometimes marmite and cheese)  So I make up a whole loaf slitting the spreads between the lot then putting the sandwhiches back in the bread bags labelled for each kid


If you wrap your sandwiches in glad wrap, you could do that now too, otherwise it pays to put something in between each sandwich to stop them from sticking together, e.g. Small pieces of baking paper.  You can reuse baking paper over and over again.
Then in the morning I just grab a sandwich from the bag and throw it into the lunch box.

  1. In the holidays or at some other “fun” time I will make pikelets or scones or another form of baking snack, we will have a few for out lunch or morning tea fresh and then the rest will be frozen in bags ready for lunches.  Make sure the items are not going to stick together when you freeze them so that you can just pull out 1 or 2 or how ever many you need each day. 
  2. I am lucky enough to have a dehydrator so I will often buy the bulk lot of bruised apples or other fruit and spend a day, peeling, slicing and dehydrating apple pieces, grated apple, or purred apple into fruit roll ups.  (This is also good when I need some fruit for a slow cooker meal or a dessert base)

So now that I have shared all these ideas and thoughts on making easy, healthy and most importantly cheap lunches for the kids…I should really get off the computer and go and make some!!

Thursday, January 17, 2013

How to Upcycle and old Men's Shirt into a baby Sleepsack


When my first little guy was born I had a few sleep sacks, this was great, being a winter baby, the warmth was good once he got too big for the swaddling wraps. …but then summer came and I found, even though it was too hot for it, he wasn’t keen to sleep without it.

So I found an old shirt my brother was getting rid of and turned it into a summer weight sleeping bag.  It just reminded him that it was time for sleeping and not to try climbing around the cot and so on.  Even now my 2 yr old wears one even though he is in a bed, they get pretty savvy at being able walk in sleepsacks! 

I will have to make a new one, using a shirt my husband doesn’t need anymore…well I don’t think he does anyway… So that I can show you the steps in photos.

Step One: - Find shirt, I think a reasonably big sized one works best so that you have enough room to play around with and it doesn’t become a tight fitting piece


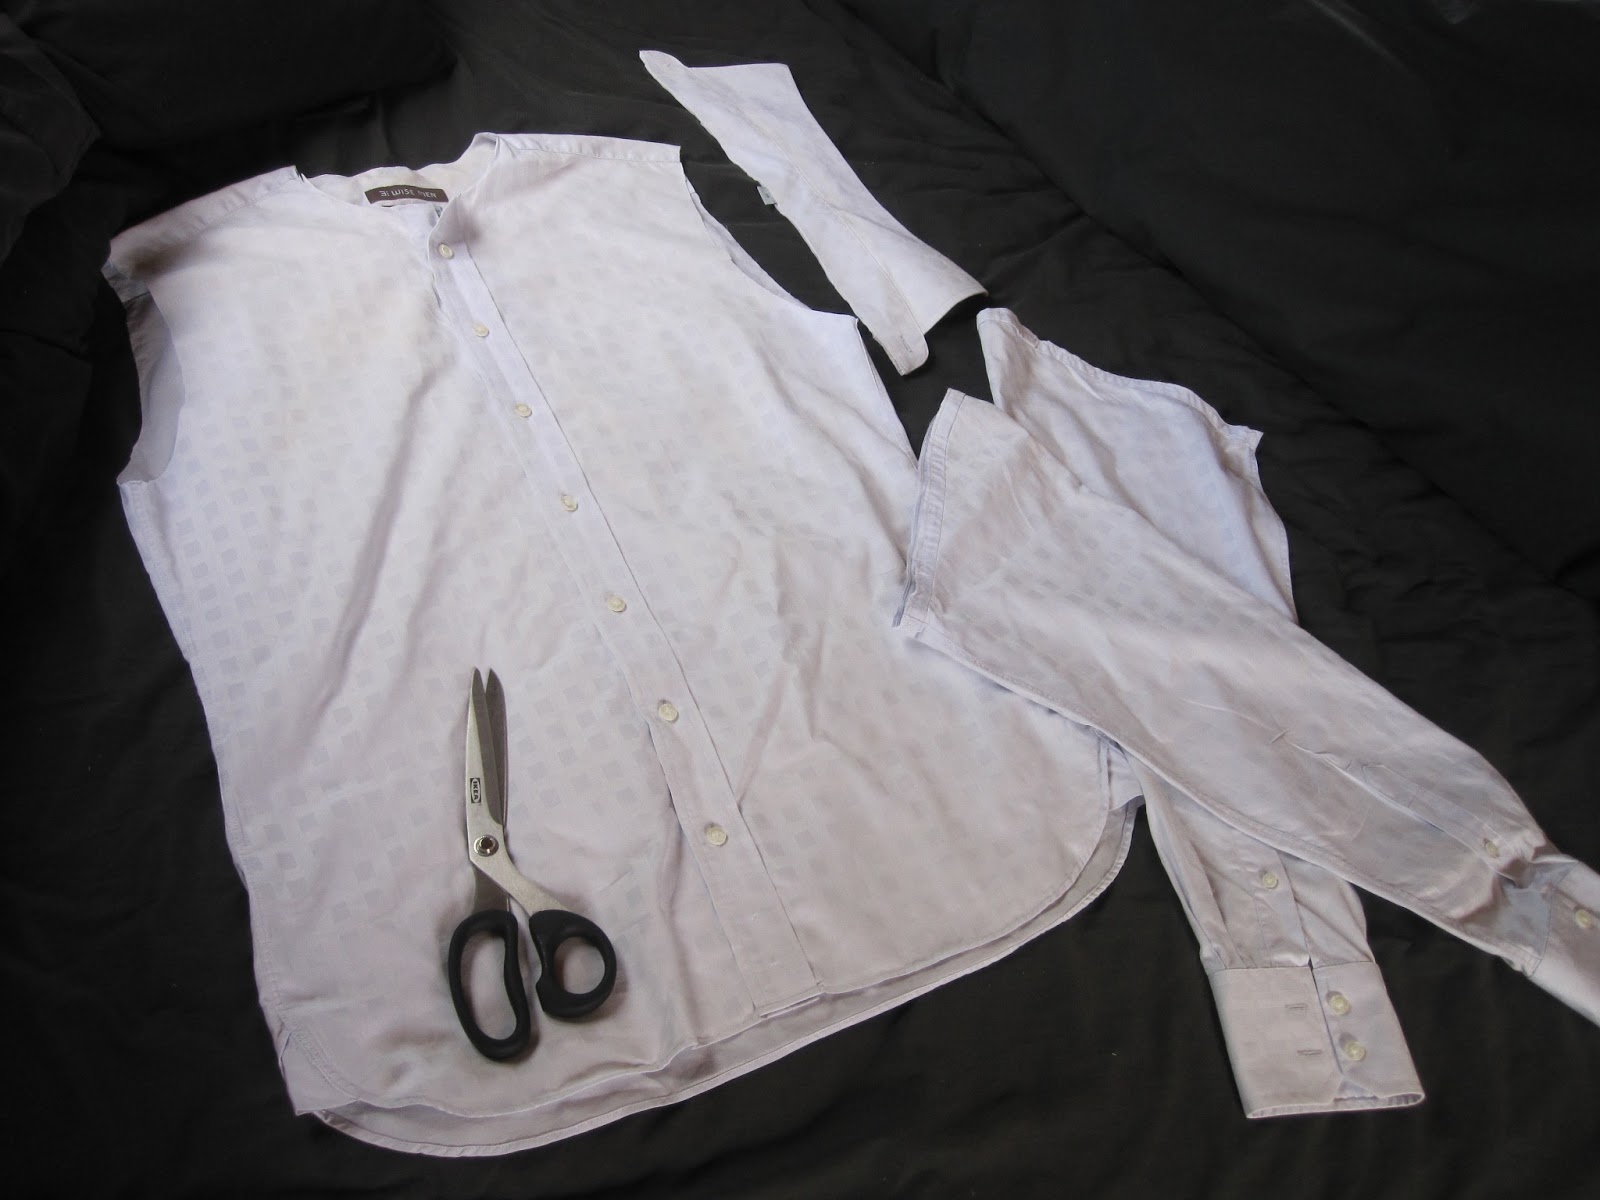
Step 2: Cut off collar and sleeves, Cut just below seam…if you wanted to be really fancy and neat and beautiful you could unpick it…but not me, I don’t think it would make enough difference…. if any… to bother with that.


Step 3: Cut down seam and through cuff of one of the sleeves.  This is to sew on to the bottom of the shirt to give it a little more length. 


Step 4:  Sew up the opening in the sleeve where the buttons are.


Step 5: Button up shirt and sew the bottom closed up about 5cm from the bottom, I did the first one up to just above the bottom button which works fine too, but maybe you would get the legs in easier with a little more room.
Sew the end of the sleeve cuff closed (right sides together)


Step 6: Turn shirt inside out and with right sides together join the sides of the sleeve to the bottom of the shirt.  You’ll end up with over lap where the sleeve was shorter than the width of the shirt.   (Or if you wanted it different, you could try cutting along the top of the sleeve (not where the seam is) then the sleeve will be longer that the shirt width, may make it easier…may not?


Step 6a - I forgot about doing this until I tried it on my little guy for the photo session.  While you do need a big shirt to get the length best, the width ends up being quite over the top, so I took the shoulders up a bit and the sides under the armholes in a bit, I am adding this step in now, because this is the best point the it should be done, but my photos are showing how I did it at the end so the seams were already finished and turned back.  Just take a chunk...about 3 cm from shoulder, and the same, 3 or 4cm from the armhole and taper off to the side seam


Step 7 – Sew up top of sleeve to meet the seam at the hem of the shirt, make it blend in as neatly as possible!  It can only come out wonky, but that is all part of the upcycling charm I say!


Step 8 Finishing off – Overlock/zigzag the top of the sleeve part that you just sewed in step 7, and neaten up the neck and the armholes, I think I will just overlock and turn mine under, but you could bind them, maybe cut a strip on a slight bias from the left over sleeve or buy a co-ordination bias binding.  Whatever tickles your fancy!

And I’ll just finish off with a couple more shots of my little one in the finished products, the original mostly though, because I have more cute ones of him in that! J


(The above 2 shots are before I took up the shoulders and took in the armhole, the one on the left is after i did that)


Check out the hand in the breast pocket!!  


I’d love to hear from you, let me know if any of this is confusing or you get lost somewhere….or even better if you had a great success with it!  Post a photo on my Facebook page of your finished product.